Open all questions about Android
Content:
➤ What is the life cycle of an activity, fragment, View
➤ What layers exist in clean architecture and what are they responsible for?
➤ What elements does an Android application consist of?
➤ What is the difference between MVP, MVVM, MVC, MVI
➤ What is Android ViewModel
➤ What are Android Broadcast Receivers
➤ What is Content Provider
➤ What is Android Context
➤ What is WorkManager
➤ Do Android programs run on JVM?
➤ Describe the architecture of the Android platform
➤ Where Bundles are stored
➤ Describe the structure of the Intent object
➤ What is Fragment Result API
➤ What is Zygote in Android
➤ How to set parameters in xml for Custom View in Kotlin
➤ What is Spannable?
➤ What is the difference between build type, flavor and build variant
➤ What is SharedPreferences
➤ What is Android ViewBinding
➤ How RecyclerView Works
➤ What is the difference between Custom View and Custom Drawing
➤ What is Deep Link and App Link
➤ What is Navigation Architecture Component, what is it for and how does it work
➤ What is Content Uri
➤ How to make transition animation for navigation component
➤ What are the advantages and disadvantages of png and svg and when is it better to use one or the other
➤ Name all cases when onSaveInstanceState and onRestoreInstanceState will be called
➤ What do dpi, dp, sp, dip, px, mm, in and pt mean?
➤ What task schedulers exist in Android
➤ What are the main Layouts in Android and what is their performance
➤ Can AndroidManifest contain multiple main activities
➤ What are multi declarations
➤ What types of services are there in Android
➤ Which classes are used to access sensors
➤ What are the main annotations and methods in Room
➤ What is the life cycle of an activity, fragment, View
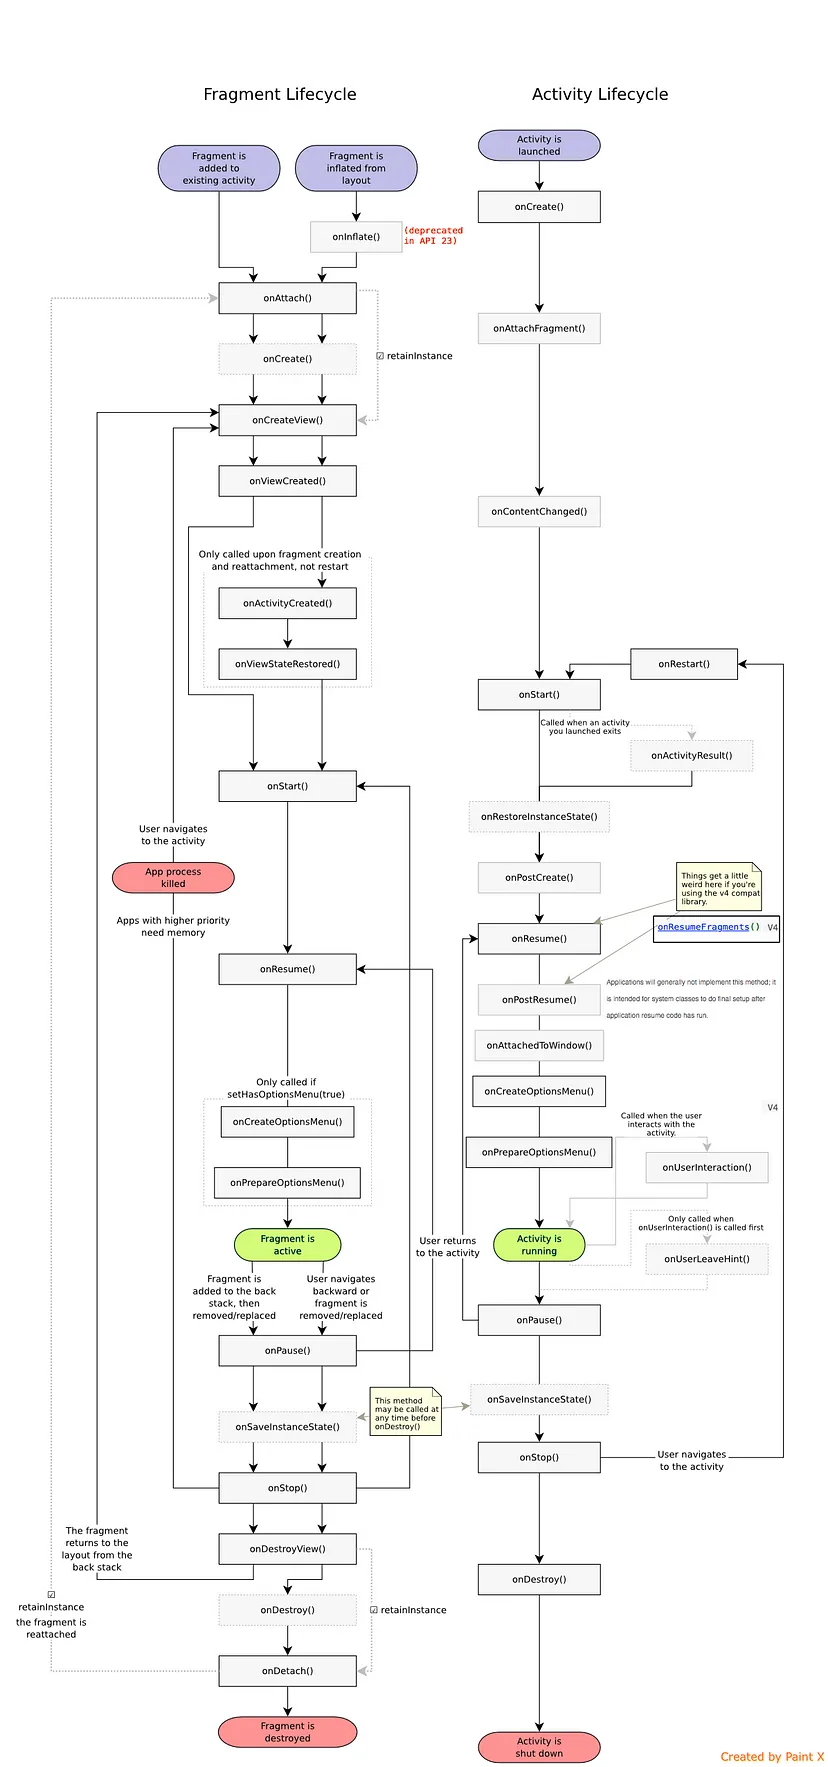
Activity Lifecycle
(Activity life cycle):
onCreate():
Called when the activity is created. This is the place to initialize the activity's core components, such as the user interface (UI) and data.
onStart():
Called when the activity becomes visible to the user.
onResume():
Called when the activity starts interacting with the user. The activity is in the foreground and the user can interact with it.
…
onPause():
Called when the activity goes into the background but is still visible. Used to save data, stop animations, or other resources that should not continue in the background.
onStop():
Called when the activity is no longer visible to the user. This happens when the activity is closed or goes into the background.
onDestroy():
Called before the activity is finally destroyed. This is the place to free up any remaining resources.
onRestart():
Called when the activity has been stopped and is started again before onStart().
import android.os.Bundle
import androidx.appcompat.app.AppCompatActivity
import android.util.Log


class MainActivity : AppCompatActivity() {

    private val TAG = "MainActivity"

    override fun onCreate(savedInstanceState: Bundle?) {
        super.onCreate(savedInstanceState)
        setContentView(R.layout.activity_main)
        Log.d(TAG, "onCreate called")
    }

    override fun onStart() {
        super.onStart()
        Log.d(TAG, "onStart called")
    }

    override fun onResume() {
        super.onResume()
        Log.d(TAG, "onResume called")
    }

    override fun onPause() {
        super.onPause()
        Log.d(TAG, "onPause called")
    }

    override fun onStop() {
        super.onStop()
        Log.d(TAG, "onStop called")
    }

    override fun onDestroy() {
        super.onDestroy()
        Log.d(TAG, "onDestroy called")
    }

    override fun onRestart() {
        super.onRestart()
        Log.d(TAG, "onRestart called")
    }

}
Fragment Lifecycle
(life cycle of a Fragment):
onAttach():
Called when a fragment attaches to its activity.
onCreate():
Called when the fragment is created. Initialization that is independent of the user interface can be performed here.
onCreateView():
Called to create the fragment's UI. This is where you need to inflate the fragment's layout.
onViewCreated():
Called after the view has been created. Final initializations of views can be performed here.
onActivityCreated():
Called when the activity's onCreate method has completed.
onStart():
Called when the fragment becomes visible to the user.
onResume():
Called when the fragment becomes active and is ready for user interaction.
…
onPause():
Called when a fragment goes into the background but is still visible.
onStop():
Called when the fragment is no longer visible.
onDestroyView():
Called before the fragment view is destroyed.
onDestroy():
Called before the fragment is destroyed.
onDetach():
Called when a fragment detaches from its activity.
import android.content.Context
import android.os.Bundle
import android.view.LayoutInflater
import android.view.View
import android.view.ViewGroup
import android.util.Log
import androidx.fragment.app.Fragment
class ExampleFragment : Fragment() {
private val TAG = "ExampleFragment"
override fun onAttach(context: Context) {
super.onAttach(context)
Log.d(TAG, "onAttach called")
}
override fun onCreate(savedInstanceState: Bundle?) {
super.onCreate(savedInstanceState)
Log.d(TAG, "onCreate called")
}
override fun onCreateView(
inflater: LayoutInflater, container: ViewGroup?,
savedInstanceState: Bundle?
): View? {
Log.d(TAG, "onCreateView called")
// Inflate the layout for this fragment
return inflater.inflate(R.layout.fragment_example, container, false)
}
override fun onViewCreated(view: View, savedInstanceState: Bundle?) {
super.onViewCreated(view, savedInstanceState)
Log.d(TAG, "onViewCreated called")
}
override fun onActivityCreated(savedInstanceState: Bundle?) {
super.onActivityCreated(savedInstanceState)
Log.d(TAG, "onActivityCreated called")
}
override fun onStart() {
super.onStart()
Log.d(TAG, "onStart called")
}
override fun onResume() {
super.onResume()
Log.d(TAG, "onResume called")
}
override fun onPause() {
super.onPause()
Log.d(TAG, "onPause called")
}
override fun onStop() {
super.onStop()
Log.d(TAG, "onStop called")
}
override fun onDestroyView() {
super.onDestroyView()
Log.d(TAG, "onDestroyView called")
}
override fun onDestroy() {
super.onDestroy()
Log.d(TAG, "onDestroy called")
}
override fun onDetach() {
super.onDetach()
Log.d(TAG, "onDetach called")
}
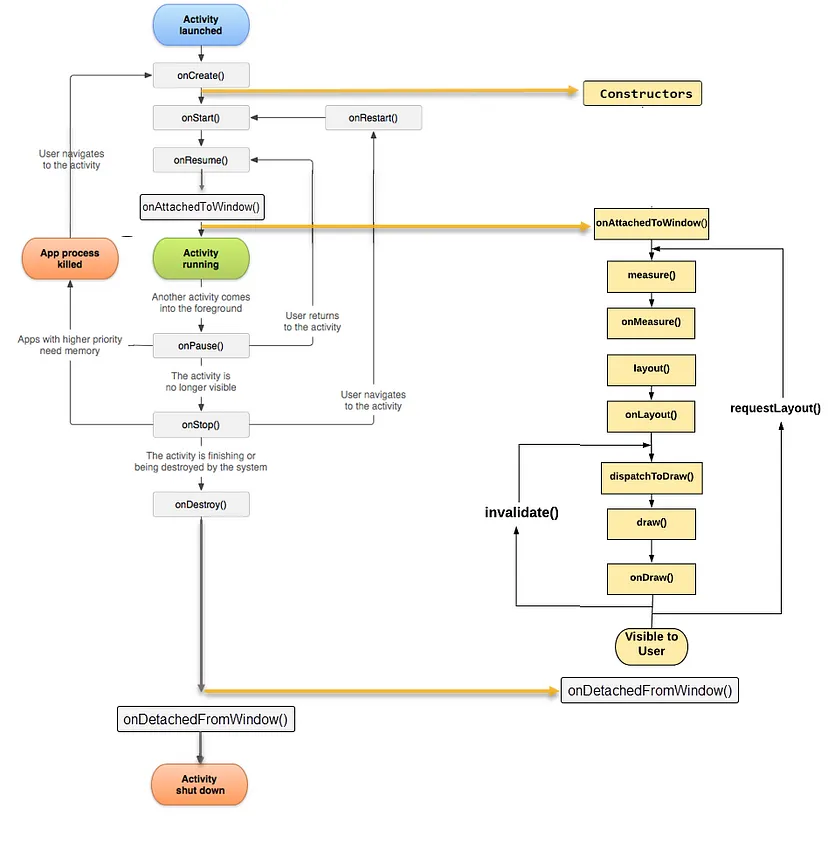
}View Lifecycle
(View life cycle):
Constructor:
when creating a custom view you must first override the constructor that initializes the View, in which you can perform the necessary calculations
onAttachedToWindow():
Called when a View is attached to a window.
onMeasure(int widthMeasureSpec, int heightMeasureSpec):
Called to determine the size of the View and its children.
onLayout(boolean changed, int left, int top, int right, int bottom):
Called to set the size and position of the View and its children.
onDraw(Canvas canvas):
Called to draw the contents of the View.
…
onDetachedFromWindow():
Called when a View is detached from a window.
import android.content.Context
import android.graphics.Canvas
import android.util.AttributeSet
import android.util.Log
import android.view.View


class CustomView @JvmOverloads constructor(
    context: Context,
    attrs: AttributeSet? = null,
    defStyleAttr: Int = 0
) : View(context, attrs, defStyleAttr) {

    private val TAG = "CustomView"

    override fun onAttachedToWindow() {
        super.onAttachedToWindow()
        Log.d(TAG, "onAttachedToWindow called")
    }

    override fun onMeasure(widthMeasureSpec: Int, heightMeasureSpec: Int) {
        super.onMeasure(widthMeasureSpec, heightMeasureSpec)
        Log.d(TAG, "onMeasure called")
        // Example: Set the size to be exactly 200x200 pixels
        setMeasuredDimension(200, 200)
    }

    override fun onLayout(changed: Boolean, left: Int, top: Int, right: Int, bottom: Int) {
        super.onLayout(changed, left, top, right, bottom)
        Log.d(TAG, "onLayout called")
        // Layout the child's views if any
    }

    override fun onDraw(canvas: Canvas?) {
        super.onDraw(canvas)
        Log.d(TAG, "onDraw called")
        // Draw the custom view content
        canvas?.drawColor(android.graphics.Color.RED)
    }

    override fun onDetachedFromWindow() {
        super.onDetachedFromWindow()
        Log.d(TAG, "onDetachedFromWindow called")
    }

}
ViewModel Lifecycle
(ViewModel lifecycle):
onCleared():
Called when the ViewModel is destroyed. This is where you can free up resources, such as canceling tasks, closing threads, etc.
import androidx.lifecycle.LiveData
import androidx.lifecycle.MutableLiveData
import androidx.lifecycle.ViewModel


class MyViewModel : ViewModel() {

    override fun onCleared() {
        super.onCleared()
        // Freeing up resources if necessary
    }

}
Service Lifecycle
(Service life cycle):
onCreate():
Called when the service is first created. Here you can initialize the necessary resources.
onStartCommand(Intent intent, int flags, int startId):
Called every time the service is started. This is where the main work of the service is performed.
onBind(Intent intent):
Called when a component (e.g. an activity) is bound to a service using bindService(). This method is only used for bound services.
…
onUnbind(Intent intent):
Called when a component detaches from its bound service.
onRebind(Intent intent):
Called if the component rebinds to the service after onUnbind() has been called.
onDestroy():
Called before the service is destroyed. Resources can be freed here.
import android.app.Service
import android.content.Intent
import android.os.IBinder
import android.util.Log


class MyService : Service() {

    private val TAG = "MyService"

    override fun onCreate() {
        super.onCreate()
        Log.d(TAG, "Service Created")
    }

    override fun onStartCommand(intent: Intent?, flags: Int, startId: Int): Int {
        Log.d(TAG, "Service Started")

        // Performing background work
        Thread(Runnable {
            try {
                // Simulation of long work
                Thread.sleep(3000)
                Log.d(TAG, "Service Running")
            } catch (e: InterruptedException) {
                e.printStackTrace()
            }
            stopSelf()
        }).start()

        // If the service should be restarted after completion, return START_STICKY
        return START_STICKY
    }

    override fun onBind(intent: Intent?): IBinder? {
        Log.d(TAG, "Service Bound")
        return null
    }

    override fun onDestroy() {
        super.onDestroy()
        Log.d(TAG, "Service Destroyed")
    }

}
➤ What layers exist in clean architecture and what are they responsible for?
Typically, the application is divided into 3 layers, which can be located in different modules – Presentation, Domain, Data:
Presentation:
UI, ViewModel and other similar classes
Domain / Business Logic:
UseCase interfaces and their implementations
repository interfaces (no implementation)
local data models that the application works with
Data:
implementations of repository interfaces
network data models
database models
Newtork API interfaces
Typically, dependencies in Gradle are configured like this:
Presentation:
implementation project(“:domain”)
implementation project(“:data”)
Data:
implementation project(':domain')
Domain:
// no
➤ What elements does an Android application consist of?
Activity:
is the main component of the user interface, which usually represents a single screen of the application. Each activity has its own life cycle and can launch other activities.
Fragment:
These are components that can be used inside activities to create a more complex user interface. Fragments also have their own life cycle and can be used to create reusable components.
Service:
These are components that perform background operations in an application without interacting with the user. Services can run in the background even after the user has closed the application.
Broadcast Receiver:
These are components that allow an application to receive messages from the system or other applications, even when the application is not active. Broadcast receivers can be used to respond to system events, such as changes in network status or battery charge.
Content Provider:
These are components that allow an application to store and exchange data with other applications or the system. Content providers can be used to access data stored in a database or on a remote server.
AndroidManifest.xml:
This is a file that contains information about the application components and its settings. The application manifest also defines the permissions required to access various device features.
➤ What is the difference between MVP, MVVM, MVC, MVI
Model-View-Controller (MVC):
divides the application into three components: Model, View and Controller.
Model:
Manages data and business logic.
View:
Responsible for displaying data and interacting with the user.
Controller:
Intermediary between View and Model, handles user actions and updates View.
// Model
data class User(val name: String, val age: Int)

// Controller
class UserController(private val view: UserView) {

    private val user = User("John Doe", 25)

    fun loadUser() {
        view.showUser(user)
    }

}

// View
interface UserView {
    fun showUser(user: User)
}

// Activity implementing View
class MainActivity : AppCompatActivity(), UserView {

    private lateinit var controller: UserController

    override fun onCreate(savedInstanceState: Bundle?) {
        super.onCreate(savedInstanceState)
        setContentView(R.layout.activity_main)
        controller = UserController(this)
        controller.loadUser()
    }

    override fun showUser(user: User) {
        // Update UI with user data
        findViewById<TextView>(R.id.textView).text = "${user.name}, ${user.age}"
    }

}
Model-View-Presenter (MVP):
divides the application into three components: Model, View and Presenter.
Model:
Manages data and business logic.
View:
Responsible for displaying data and interacting with the user.
Presenter:
Intermediary between View and Model, handles user actions and updates View.
// Model
data class User(val name: String, val age: Int)

// View
interface UserView {
    fun showUser(user: User)
}

// Presenter
class UserPresenter(private val view: UserView) {

    private val user = User("John Doe", 25)

    fun loadUser() {
        view.showUser(user)
    }

}

// Activity implementing View
class MainActivity : AppCompatActivity(), UserView {

    private lateinit var presenter: UserPresenter

    override fun onCreate(savedInstanceState: Bundle?) {
        super.onCreate(savedInstanceState)
        setContentView(R.layout.activity_main)
        presenter = UserPresenter(this)
        presenter.loadUser()
    }

    override fun showUser(user: User) {
        // Update UI with user data
        findViewById<TextView>(R.id.textView).text = "${user.name}, ${user.age}"
    }

}
Model-View-ViewModel (MVVM):
divides the application into three components: Model, View and ViewModel.
Model:
Manages data and business logic.
View:
Responsible for displaying data and interacting with the user.
ViewModel:
An intermediary between the View and the Model, it manages data for the View and handles user actions.
// Model
data class User(val name: String, val age: Int)

// ViewModel
class UserViewModel : ViewModel() {

    private val _user = MutableLiveData<User>()
    val user: LiveData<User> get() = _user

    fun loadUser() {
        _user.value = User("John Doe", 25)
    }

}

// Activity
class MainActivity : AppCompatActivity() {

    private lateinit var viewModel: UserViewModel

    override fun onCreate(savedInstanceState: Bundle?) {
        super.onCreate(savedInstanceState)
        setContentView(R.layout.activity_main)
        viewModel = ViewModelProvider(this).get(UserViewModel::class.java)
        viewModel.user.observe(this, Observer { user ->
            // Update UI with user data
            findViewById<TextView>(R.id.textView).text = "${user.name}, ${user.age}"
        })
        viewModel.loadUser()
    }

}
Model-View-Intent (MVI):
is based on the concepts of reactive programming and uni-directional data flow.
Model:
Manages data and business logic.
View:
Responsible for displaying data and interacting with the user.
Intent:
Determines user intent and directs it for processing.
// Model
data class User(val name: String, val age: Int)

// View State
data class UserViewState(val user: User? = null)

// Intent
sealed class UserIntent {
    object LoadUser : UserIntent()
}

// ViewModel
class UserViewModel : ViewModel() {

    private val _viewState = MutableLiveData<UserViewState>()
    val viewState: LiveData<UserViewState> get() = _viewState

    fun processIntents(intent: UserIntent) {
        when (intent) {
            is UserIntent.LoadUser -> loadUser()
        }
    }

    private fun loadUser() {
        _viewState.value = UserViewState(User("John Doe", 25))
    }

}

// Activity
class MainActivity : AppCompatActivity() {

    private lateinit var viewModel: UserViewModel

    override fun onCreate(savedInstanceState: Bundle?) {
        super.onCreate(savedInstanceState)
        setContentView(R.layout.activity_main)
        viewModel = ViewModelProvider(this).get(UserViewModel::class.java)
        viewModel.viewState.observe(this, Observer { viewState ->
            viewState.user?.let { user ->
                // Update UI with user data
                findViewById<TextView>(R.id.textView).text = "${user.name}, ${user.age}"
            }
        })
        // Dispatch intent to load user
        viewModel.processIntents(UserIntent.LoadUser)
    }

}
MVP:
Convenient for small applications. Presenter directly manages View and Model.
MVVM:
Well suited for applications with reactive programming and a lot of UI logic. ViewModel provides two-way data binding.
MVC:
The simplest pattern. The Controller manages the interaction between the Model and View.
MVI:
Suitable for complex applications using reactive programming and unidirectional data flow. Intent and View State make application logic predictable and easy to test.
➤ What is Android ViewModel
Android ViewModel:
is a component of the Jetpack architecture that helps to save and manage data of UI components (Activity, Fragment) during screen rotations, application rebuilds and other changes in the application life cycle.
ViewModel is part of the Model-View-ViewModel (MVVM) architectural pattern and is typically used in conjunction with LiveData to provide up-to-date data to the user interface.
ViewModel has only one lifecycle method – OnCleared()
Android SharedViewModel:
It is a Jetpack architecture component that allows data to be exchanged between two or more related UI components (Activity, Fragment) using the same ViewModel instance.
SharedViewModel is typically used in cases where two or more UI components need to access the same data but are not directly related to each other. For example, in a case where we have a list of items in one fragment and the item details are displayed in another fragment that is in a different Activity.
➤ What are Android Broadcast Receivers
Android components that allow an application to receive system and user messages (broadcast) from other applications, as well as from the system itself.
The Broadcast Receiver listens for and filters messages, and if an event matches the specified filters, it runs the code associated with that event.
Examples of such events may include a change in network status, a change in battery level, receiving a message from another application, etc.
Broadcast Receiver can be used to perform some tasks on the device, such as notifying the user about changes in the device state or running tasks in the background.
To use Android Broadcast Receiver, you need to create a class that extends the BroadcastReceiver class and overrides the onReceive() method, which will be called when a broadcast message is received.
class MyBroadcastReceiver : BroadcastReceiver() {

    override fun onReceive(context: Context?, intent: Intent?) {
        // processing the received message
    }

}
Next, you need to register this Broadcast Receiver in the AndroidManifest.xml file:
<receiver android:name=".MyBroadcastReceiver">
    <intent-filter>
        <action android:name="android.intent.action.ACTION_NAME" />
    </intent-filter>
</receiver>
In this example, MyBroadcastReceiver will handle messages with the action “android.intent.action.ACTION_NAME”. When such a message is received, the onReceive() method of this Broadcast Receiver will be called.
You can also register a Broadcast Receiver dynamically in your code using the registerReceiver() and unregisterReceiver() methods of the Context class.
➤ What is Content Provider
a component of the Android application architecture that provides access to application data from outside the application. It can be used to exchange data between applications, provide access to data from other applications, or store and retrieve data from a database.
Here is an example of using Content Provider to save and retrieve data from a SQLite database in Android:
Defining a content provider in the application manifest:
<manifest xmlns:android="http://schemas.android.com/apk/res/android"
    package="com.example.myapp">
    <application>
        ...
        <provider
            android:name=".MyContentProvider"
            android:authorities="com.example.myapp.provider"
            android:exported="false" />
    </application>
</manifest>
Creating the MyContentProvider class:
ABOUTn will inherit from ContentProvider and define the database and URI that will be used to access the data
class MyContentProvider : ContentProvider() {

    private lateinit var dbHelper: MyDatabaseHelper

    override fun onCreate(): Boolean {
        context?.let {
            dbHelper = MyDatabaseHelper(it)
        }
        return true
    }

    override fun query(
        uri: Uri,
        projection: Array<String>?,
        selection: String?,
        selectionArgs: Array<String>?,
        sortOrder: String?
    ): Cursor? {
        val db = dbHelper.readableDatabase
        val cursor = db.query(
            TABLE_NAME,
            projection,
            selection,
            selectionArgs,
            null,
            null,
            sortOrder
        )
        cursor.setNotificationUri(context?.contentResolver, uri)
        return cursor
    }

    override fun getType(uri: Uri): String? {
        return "vnd.android.cursor.dir/$AUTHORITY.$TABLE_NAME"
    }

    override fun insert(uri: Uri, values: ContentValues?): Uri? {
        val db = dbHelper.writableDatabase
        val id = db.insert(TABLE_NAME, null, values)
        context?.contentResolver?.notifyChange(uri, null)
        return ContentUris.withAppendedId(uri, id)
    }

    override fun delete(uri: Uri, selection: String?, selectionArgs: Array<String>?): Int {
        val db = dbHelper.writableDatabase
        val count = db.delete(TABLE_NAME, selection, selectionArgs)
        context?.contentResolver?.notifyChange(uri, null)
        return count
    }

    override fun update(
        uri: Uri,
        values: ContentValues?,
        selection: String?,
        selectionArgs: Array<String>?
    ): Int {
        val db = dbHelper.writableDatabase
        val count = db.update(TABLE_NAME, values, selection, selectionArgs)
        context?.contentResolver?.notifyChange(uri, null)
        return count
    }

    companion object {
        const val AUTHORITY = "com.example.myapp.provider"
        const val TABLE_NAME = "my_table"
        val CONTENT_URI: Uri = Uri.parse("content://$AUTHORITY/$TABLE_NAME")
    }

}
Using a content provider to access data from another application:
val cursor = contentResolver.query(MyContentProvider.CONTENT_URI, null, null, null, null)
➤ What is Android Context
A base abstract class, the implementation of which is provided by the Android system. This class has methods for accessing application-specific resources and classes and is used to perform application-level operations, such as starting activities, sending broadcast messages, receiving intents, etc. The Context class is inherited by such large and important classes as Application, Activity, and Service, so all its methods are accessible from these classes.
Activity Context:
Created when the activity is created and destroyed together with the activity. Context is a heavy object. When talking about memory leaks in Android, they mean context leaks, i.e. a situation when the activity context is stored after calling Activity.onDestroy(). Do not pass the activity context to another object if you do not know how long this object will live.
Application Context:
Singleton. Application Context is created when the Application object is created and lives as long as the application process lives. For this reason, Application Context can be safely injected into other singletons in the application. It is not recommended to use Application Context for starting an activity, because it requires creating a new task, and for layout inflation, because the default theme is used.
You can get context within the code using one of the following methods:
getBaseContext:
get reference to base context
getApplicationContext:
get a reference to the application object
getContext:
inside an activity or service get a reference to this object)
this:
same as getContext
MainActivity.this:
inside a nested class or method get a reference to the MainActivity object
getActivity:
inside the fragment get a reference to the parent activity object
There is also a difference:
getContext():
returns a nullable Context value.
requireContext():
returns a non-null Context value or throws an exception if it is not available.
If your code is in a lifecycle phase where you know your fragment is attached to a context, just use requireContext() to get the Context and also to keep static analyzers happy about potential NPE issues.
If your code is outside the normal fragment lifecycle (say, an asynchronous callback), you might be better off using getContext() , checking its return value yourself, and only continuing to use it if it's non-null.
➤ What is WorkManager
An Android library for scheduling and running asynchronous tasks in the background. It provides a simple way to run tasks even when the app is already closed, and automatically manages task launches to minimize device resource consumption.
class MyWorker(appContext: Context, workerParams: WorkerParameters) : Worker(appContext, workerParams) {
    override fun doWork(): Result {
        // An asynchronous task is performed here, such as downloading a file.
        return Result.success()
    }
}

val myWorkRequest = OneTimeWorkRequestBuilder<MyWorker>().build()
WorkManager.getInstance(context)
    .enqueue(myWorkRequest)

// example for several
val workA = OneTimeWorkRequestBuilder<MyWorkerA>().build()
val workB = OneTimeWorkRequestBuilder<MyWorkerB>().build()
val workC = OneTimeWorkRequestBuilder<MyWorkerC>().build()
val workD = OneTimeWorkRequestBuilder<MyWorkerD>().build()
WorkManager.getInstance(context)
    .beginWith(workA, workB, workC)
    .combine()
    .then(workD)
    .enqueue()
enqueue():
places the task in a queue for execution. It will be executed as soon as the device is ready for it (for example, if there is an Internet connection, the battery is sufficiently charged, etc.).
beginWith():
used to run multiple tasks in a specified order.
combine():
used to run multiple tasks in parallel and wait for them to complete before executing the next task.
WorkManager and LiveData:
allows you to receive notifications about the status of tasks in WorkManager. For example, you can create a LiveData object and use it to display the progress of a task.
class MyViewModel(application: Application) : AndroidViewModel(application) {

    private val workManager = WorkManager.getInstance(application)
    private val workInfoLiveData = MutableLiveData<WorkInfo>()

    fun startWork() {
        val workRequest = OneTimeWorkRequestBuilder<MyWorker>()
            .build()
        workManager.enqueue(workRequest)
        workManager.getWorkInfoByIdLiveData(workRequest.id)
            .observeForever { workInfo ->
                workInfo?.let {
                    workInfoLiveData.postValue(workInfo)
                }
            }
    }

    fun getWorkInfoLiveData(): LiveData<WorkInfo> {
        return workInfoLiveData
    }

}

class MyActivity : AppCompatActivity() {

    private lateinit var viewModel: MyViewModel

    override fun onCreate(savedInstanceState: Bundle?) {
        super.onCreate(savedInstanceState)
        viewModel = ViewModelProviders.of(this).get(MyViewModel::class.java)
        viewModel.getWorkInfoLiveData().observe(this, { workInfo ->
            if (workInfo != null && workInfo.state == WorkInfo.State.RUNNING) {
                // Displaying progress
            } else if (workInfo != null && workInfo.state.isFinished) {
                // Task completed
            }
        })
        viewModel.startWork()
    }

}
WorkManager and RxJava:
You can use the RxWorkManager library, which provides a convenient way to create Observable streams from WorkRequest objects. Here is an example of using RxWorkManager to start a OneTimeWorkRequest and receive the result as a Single:
val workRequest = OneTimeWorkRequestBuilder<MyWorker>()
    .build()

val workObservable = RxWorkManager
    .getInstance(application)
    .getWorkInfoByIdObservable(workRequest.id)
    .flatMap { workInfo ->
        if (workInfo.state == WorkInfo.State.SUCCEEDED) {
            val outputData = workInfo.outputData
            Single.just(outputData.getString("result"))
        } else {
            Single.error(Throwable("Work failed"))
        }
    }

workObservable.subscribeOn(Schedulers.io())
    .observeOn(AndroidSchedulers.mainThread())
    .subscribe({ result ->
            // Processing a successful result
        },{ error ->
            // Error handling
        }
    )

WorkManager.getInstance(application).enqueue(workRequest)
WorkManager and coroutines:
You can use the kotlinx-coroutines-play-services library, which provides a convenient way to run and track tasks in WorkManager using coroutines.
val workRequest = OneTimeWorkRequestBuilder<MyWorker>()
    .build()
val workInfoDeferred = WorkManager.getInstance(context)
    .getWorkInfoById(workRequest.id)
    .asDeferred()

// Run the task in a background thread
GlobalScope.launch(Dispatchers.IO) {
    WorkManager.getInstance(context).enqueue(workRequest)
}

// Waiting for the task execution result in the main thread
val workInfo = workInfoDeferred.await()
if (workInfo.state == WorkInfo.State.SUCCEEDED) {
    val outputData = workInfo.outputData
    val result = outputData.getString("result")
    // Processing a successful result
} else {
    // Error handling
}➤ Do Android programs run on JVM?
No, JVM bytecode is interpreted into ART (Android Runtime) bytecode and then executed. Before version 5.0, ART was DRT (Dalvik)
➤ Describe the architecture of the Android platform
Linux Kernel:
The heart of Android, where interprocess safety and low-level memory management are implemented.
Hardware Abstraction Layer (HAL):
Interfaces for working with hardware. Driver for USB, Bluetooth, OpenGL programming interface. The level that gives Android platform independence.
Android Runtime and Native Libraries:
What user code does: compilers, garbage collector, bytecode interpreter.
Android Framework:
Java API through which the user program interacts with the system. Providing the life cycle of system components.
Android Applications:
Directly applications, both user and system (calendar, camera, etc.).
➤ Where Bundles are stored
is a class used to pass data between application components such as Activities, Fragments, and Services. A Bundle acts as a container for key-value pairs, where the keys are strings and the values can be of different types, including primitive types, objects implementing the Serializable or Parcelable interface.
Main scenarios for using Bundle:
Transferring data between activities
Saving the state of activity
Transferring data between fragments
Transferring data to the service
Bundle is stored in the ActivityManagerService system class. For each launched activity, an instance of the ActivityRecord class is created. This class has an icicle field of the Bundle type. It is in this field that the state is saved after calling onSaveInstanceState().
When an activity is stopped, the Bundle is sent to the system process via the Bindler IPC. Then, the activityStopped() method is called on the ActivityManagerService class, which receives a Bundle object. This method finds the ActivityRecord corresponding to the stopped activity and writes the received Bundle to the icicle field of the ActivityRecord class.
Transferring data between activities:
import android.content.Intent
import android.os.Bundle
import androidx.appcompat.app.AppCompatActivity
import kotlinx.android.synthetic.main.activity_main.*


class MainActivity : AppCompatActivity() {

    override fun onCreate(savedInstanceState: Bundle?) {
        super.onCreate(savedInstanceState)
        setContentView(R.layout.activity_main)
        button.setOnClickListener {
            val intent = Intent(this, SecondActivity::class.java)
            val bundle = Bundle().apply {
                putString("KEY_MESSAGE", "Hello from MainActivity")
                putInt("KEY_NUMBER", 123)
            }
            intent.putExtras(bundle)
            startActivity(intent)
        }
    }

}
import android.os.Bundle
import androidx.appcompat.app.AppCompatActivity
import kotlinx.android.synthetic.main.activity_second.*
class SecondActivity : AppCompatActivity() {
override fun onCreate(savedInstanceState: Bundle?) {
super.onCreate(savedInstanceState)
setContentView(R.layout.activity_second)
val bundle = intent.extras
val message = bundle?.getString("KEY_MESSAGE")
val number = bundle?.getInt("KEY_NUMBER")
textView.text = "$message, Number: $number"
}
}Saving the activity state:
import android.os.Bundle
import androidx.appcompat.app.AppCompatActivity


class MainActivity : AppCompatActivity() {

    private var counter: Int = 0

    override fun onCreate(savedInstanceState: Bundle?) {
        super.onCreate(savedInstanceState)
        setContentView(R.layout.activity_main)
        // Restoring the state
        savedInstanceState?.let {
            counter = it.getInt("KEY_COUNTER", 0)
        }
    }

    override fun onSaveInstanceState(outState: Bundle) {
        super.onSaveInstanceState(outState)
        // Saving state
        outState.putInt("KEY_COUNTER", counter)
    }

}
Transferring data between fragments:
import android.os.Bundle
import androidx.fragment.app.Fragment
import android.view.LayoutInflater
import android.view.View
import android.view.ViewGroup
import kotlinx.android.synthetic.main.fragment_first.*


class FirstFragment : Fragment() {

    override fun onCreateView(
        inflater: LayoutInflater, container: ViewGroup?,
        savedInstanceState: Bundle?
    ): View? {
        return inflater.inflate(R.layout.fragment_first, container, false)
    }

    override fun onViewCreated(view: View, savedInstanceState: Bundle?) {
        super.onViewCreated(view, savedInstanceState)
        button.setOnClickListener {
            val bundle = Bundle().apply {
                putString("KEY_MESSAGE", "Hello from FirstFragment")
            }
            val secondFragment = SecondFragment().apply {
                arguments = bundle
            }
            fragmentManager?.beginTransaction()
                ?.replace(R.id.fragment_container, secondFragment)
                ?.addToBackStack(null)
                ?.commit()
        }
    }

}
import android.os.Bundle
import androidx.fragment.app.Fragment
import android.view.LayoutInflater
import android.view.View
import android.view.ViewGroup
import kotlinx.android.synthetic.main.fragment_second.*
class SecondFragment : Fragment() {
override fun onCreateView(
inflater: LayoutInflater, container: ViewGroup?,
savedInstanceState: Bundle?
): View? {
return inflater.inflate(R.layout.fragment_second, container, false)
}
override fun onViewCreated(view: View, savedInstanceState: Bundle?) {
super.onViewCreated(view, savedInstanceState)
val message = arguments?.getString("KEY_MESSAGE")
textView.text = message
}
}➤ Describe the structure of the Intent object
It is a mechanism for initiating actions within an application or between different applications. Intent is used for various tasks, such as starting an activity, sending data between components, starting services, broadcasting messages, etc.
Main types of Intent:
Explicit Intent:
Used to launch a specific component within your application. You explicitly specify the class of the component that should be launched.
// MainActivity.kt
class MainActivity : AppCompatActivity() {
    override fun onCreate(savedInstanceState: Bundle?) {
        super.onCreate(savedInstanceState)
        setContentView(R.layout.activity_main)
        val button = findViewById<Button>(R.id.button)
        button.setOnClickListener {
            val intent = Intent(this, SecondActivity::class.java)
            startActivity(intent)
        }
    }
}


// SecondActivity.kt
class SecondActivity : AppCompatActivity() {
    override fun onCreate(savedInstanceState: Bundle?) {
        super.onCreate(savedInstanceState)
        setContentView(R.layout.activity_second)
    }
}
Data transfer:
// MainActivity.kt
val intent = Intent(this, SecondActivity::class.java).apply {
    putExtra("EXTRA_MESSAGE", "Hello, SecondActivity!")
}
startActivity(intent)


// SecondActivity.kt
class SecondActivity : AppCompatActivity() {
    override fun onCreate(savedInstanceState: Bundle?) {
        super.onCreate(savedInstanceState)
        setContentView(R.layout.activity_second)
        val message = intent.getStringExtra("EXTRA_MESSAGE")
        findViewById<TextView>(R.id.textView).text = message
    }
}
Implicit Intent:
Used to perform an action without specifying a specific component. Instead, you specify the desired action and the system to find the appropriate component to perform that action.
Launch a web browser to open the URL:
val intent = Intent(Intent.ACTION_VIEW)
intent.data = Uri.parse("https://www.example.com")
startActivity(intent)
Sending email:
val intent = Intent(Intent.ACTION_SENDTO).apply {
    data = Uri.parse("mailto:") // For email applications only
    putExtra(Intent.EXTRA_EMAIL, arrayOf("[email protected]"))
    putExtra(Intent.EXTRA_SUBJECT, "Subject of Email")
}
if (intent.resolveActivity(packageManager) != null) {
    startActivity(intent)
}
Main attributes:
Action:
A string that specifies the action to be performed, such as ACTION_VIEW, ACTION_SEND, ACTION_MAIN, etc.
Data:
A URI specifying the data on which the action is to be performed.
Category:
Additional properties for filtering components that can handle intents.
Extras:
Additional data that can be passed to the component, for example putExtra("key", value).
Component:
The class name of the component that should be launched (for explicit intents).
➤ What is Fragment Result API
In some cases, you may need to pass a one-time value between two fragments, or between a fragment and its host activity. For example, you might have a fragment that reads QR codes, passing the data back to the previous fragment. Starting with Fragment 1.3.0-alpha04, each FragmentManager implements FragmentResultOwner. This means that a FragmentManager can act as a central repository for fragment results. This change allows components to communicate with each other by setting fragment results and listening to those results without requiring those components to have direct references to each other.
To pass data back to fragment A from fragment B, first set a result listener on fragment A that receives the result. Call setFragmentResultListener() on fragment A's FragmentManager, as shown in the following example:
// We send the result to another fragment
val someData = "123"
SomeFragmentManager?.setFragmentResult(
  BUNDLE_KEY,
  bundleOf(STRING_KEY to someData)
)
// we get the result in another fragment
SomeFragmentManager?.setFragmentResultListener(
 BUNDLE_KEY, viewLifecycleOwner
) { _, bundle ->
bundle.getString(STRING_KEY)?.let(viewModel::setString)➤ What is Zygote in Android
In the Android operating system, the Zygote process is a special process that runs at system startup and is responsible for pre-initialization, compilation, and caching of application code to speed up their launch.
When you launch a new application, Zygote creates a new process that inherits the precompiled code from Zygote, which also helps speed up application startup and reduce memory consumption.
Zygote also provides system services and resources that can be used in applications, such as system widgets, location services, security certificates, etc.
Zygote plays an important role in Android performance as it allows applications to launch faster and ensures more efficient use of system resources.
➤ How to set parameters in xml for Custom View in Kotlin
class CustomView @JvmOverloads constructor(
  context: Context,
  attrs: AttributeSet? = null,
  defStyleAttr: Int = 0
) : LinearLayout(context, attrs, defStyleAttr) {

  init {
    setupAttributes(attrs)
  }

  private fun setupAttributes(attrs: AttributeSet?) {
    context.withStyledAttributes(attrs, R.styleable.CustomView) {
      getBoolean(R.styleable.CustomView_variable_name, true).let { variable ->
      }
    }
  }

}
// in attrs.xml we write <declare-styleable name="CustomView"> <attr format="boolean" name="variable_name" /> </declare-styleable> // now we can add in the fragment layout <com._.CustomView android:id="@+id/customView" android:layout_width="0dp" android:layout_height="wrap_content" app:variable_name="true" /> // now you can see it in the preview and in the application // changes associated with this variable // if this is only needed for preview, // use tools:variable_name="true" instead of app:variable_name="true"
Basic types of variables:
<attr format="boolean" name="name">
<attr format="string"name="name">
<attr format="integer"name="name">
<attr format="reference"name="name">
<attr format="color"name="name">
<attr format="reference|color"name="name">
<attr format="dimension"name="name">
<attr format="enum" name="gravity">
    <enum name="start" value="0" />
    <enum name="end" value="1" />
</attr>➤ What is Spannable
An interface that extends CharSequence and allows you to add styles and other attributes to parts of the text. It is a powerful tool for working with text, allowing you to change its display, add links, colors, images and other effects.
Spannable:
An interface that extends CharSequence and allows changing text styles.
SpannableString:
A class that implements Spannable and is used to apply styles to strings.
SpannableStringBuilder:
A class that allows you to create and modify text with different styles.
Spans Types:
StyleSpan:
Applies a style (such as bold or italic).
ForegroundColorSpan:
Changes the color of the text.
BackgroundColorSpan:
Changes the background color of the text.
UnderlineSpan:
Adds underlining to text.
StrikethroughSpan:
Adds strikethrough text.
ClickableSpan:
Makes text clickable and allows actions to be performed when clicked.
ImageSpan:
Inserts an image into the text.
URLSpan:
Creates a hyperlink.
import android.graphics.Color
import android.os.Bundle
import android.text.Spannable
import android.text.SpannableString
import android.text.SpannableStringBuilder
import android.text.Spanned
import android.text.style.*
import android.view.View
import android.widget.TextView
import androidx.appcompat.app.AppCompatActivity


class MainActivity : AppCompatActivity() {

    override fun onCreate(savedInstanceState: Bundle?) {
        super.onCreate(savedInstanceState)
        setContentView(R.layout.activity_main)
        val textView = findViewById<TextView>(R.id.textView)
        val spannableString = SpannableString("Hello, World! This is a spannable string.")
        // Applying bold style to the text "Hello"
        val boldSpan = StyleSpan(android.graphics.Typeface.BOLD)
        spannableString.setSpan(boldSpan, 0, 5, Spanned.SPAN_EXCLUSIVE_EXCLUSIVE)
        // Applying text color to "World"
        val colorSpan = ForegroundColorSpan(Color.RED)
        spannableString.setSpan(colorSpan, 7, 12, Spanned.SPAN_EXCLUSIVE_EXCLUSIVE)
        // Applying underscore to "This"
        val underlineSpan = UnderlineSpan()
        spannableString.setSpan(underlineSpan, 14, 18, Spanned.SPAN_EXCLUSIVE_EXCLUSIVE)
        // Apply strikethrough to "spannable"
        val strikethroughSpan = StrikethroughSpan()
        spannableString.setSpan(strikethroughSpan, 23, 33, Spanned.SPAN_EXCLUSIVE_EXCLUSIVE)
        // Applying clickable text to "string"
        val clickableSpan = object : ClickableSpan() {
            override fun onClick(widget: View) {
                // Action when clicking on text
            }
            override fun updateDrawState(ds: TextPaint) {
                super.updateDrawState(ds)
                ds.isUnderlineText = false // Removing the underline
            }
        }
        spannableString.setSpan(clickableSpan, 34, 40, Spanned.SPAN_EXCLUSIVE_EXCLUSIVE)
        textView.text = spannableString
        textView.movementMethod = android.text.method.LinkMovementMethod.getInstance()
    }

}
Using SpannableStringBuilder:
val spannableStringBuilder = SpannableStringBuilder()
spannableStringBuilder.append("Bold Text")
spannableStringBuilder.setSpan(StyleSpan(android.graphics.Typeface.BOLD), 0, 9, Spanned.SPAN_EXCLUSIVE_EXCLUSIVE)
spannableStringBuilder.append(" and ")
spannableStringBuilder.append("Red Text")
spannableStringBuilder.setSpan(ForegroundColorSpan(Color.RED), 14, 22, Spanned.SPAN_EXCLUSIVE_EXCLUSIVE)
textView.text = spannableStringBuilder➤ What is the difference between build type, flavor and build variant
Build Type:
used to set build settings, such as whether proguard will be used and what certificate the apk is signed with. The most commonly used build types are debug and release. The build type is specified by the buildTypes parameter in the gradle file.
buildTypes {
   debug {
       applicationIdSuffix ".debug"
       debuggable true
       minifyEnabled false
   }
   release {
       minifyEnabled false
       proguardFiles getDefaultProguardFile('proguard-android.txt'), 'proguard-rules.pro'
   }
}
Flavor:
used to define application assemblies with different functionality. These can be paid features, different target APIs, different resources. It is set by the productFlavors parameter in the gradle file.
productFlavors {
    free {
      dimension "version"
       applicationId "ru.itsobes.flavors.free"
      resValue "string", "flavored_app_name", "Free It Sobes App"
    }
    paid {
       dimension "version"
       applicationId "ru.itsobes.flavors.paid"
       resValue "string", "flavored_app_name", "Paid It Sobes App"
    }
}
Build Option:
is a combination of build type and flavor. For the build type and flavor described above, four build variants are created: freeDebug, freeRelease, paidDebug, paidRelease.
➤ What is SharedPreferences
SharedPreferences:
saves data as key-value pairs in the application folders. It has an Editor for editing, commit(), which returns the results of saving, and apply(), which does not return results.
SharedPreferences has an OnSharedPreferenceChangeListener that allows you to listen for changes by key
EncryptedSharedPreferences:
This is an encrypted implementation of sharedPreferences
DataStore:
is a replacement for SharedPreferences that addresses most of these shortcomings. DataStore includes a fully asynchronous API using Kotlin Coroutines and Flow.
➤ What is Android ViewBinding
A mechanism in Android that generates bindings to XML layouts at compile time. This allows you to safely and efficiently interact with views in your code, eliminating the need to use the findViewById method and reducing the likelihood of NullPointerException errors.
The main advantages of ViewBinding:
Type safety:
The code generated by ViewBinding ensures that you only access existing views.
Avoiding NullPointerException:
ViewBinding generates classes that are null-safe, which reduces the chance of getting a NullPointerException.
Simplifying the code:
Eliminates the need to explicitly call findViewById, making the code cleaner and simpler.
android {
    viewBinding {
        enabled = true
    }
}
Using ViewBinding in Activity:
<?xml version="1.0" encoding="utf-8"?>
<LinearLayout xmlns:android="http://schemas.android.com/apk/res/android"
    android:layout_width="match_parent"
    android:layout_height="match_parent"
    android:orientation="vertical">
    <TextView
        android:id="@+id/textView"
        android:layout_width="wrap_content"
        android:layout_height="wrap_content"
        android:text="Hello, ViewBinding!" />
    <Button
        android:id="@+id/button"
        android:layout_width="wrap_content"
        android:layout_height="wrap_content"
        android:text="Click me" />
</LinearLayout>
import android.os.Bundle
import androidx.appcompat.app.AppCompatActivity
import com.example.viewbindingexample.databinding.ActivityMainBinding
class MainActivity : AppCompatActivity() {
private lateinit var binding: ActivityMainBinding
override fun onCreate(savedInstanceState: Bundle?) {
super.onCreate(savedInstanceState)
binding = ActivityMainBinding.inflate(layoutInflater)
setContentView(binding.root)
binding.textView.text = "Updated with ViewBinding!"
binding.button.setOnClickListener {
binding.textView.text = "Button Clicked!"
}
}
}Using ViewBinding in a fragment:
<?xml version="1.0" encoding="utf-8"?>
<FrameLayout xmlns:android="http://schemas.android.com/apk/res/android"
    android:layout_width="match_parent"
    android:layout_height="match_parent">
    <TextView
        android:id="@+id/textView"
        android:layout_width="wrap_content"
        android:layout_height="wrap_content"
        android:text="Hello, ViewBinding in Fragment!" />
</FrameLayout>
import android.os.Bundle
import android.view.LayoutInflater
import android.view.View
import android.view.ViewGroup
import androidx.fragment.app.Fragment
import com.example.viewbindingexample.databinding.FragmentExampleBinding
class ExampleFragment : Fragment() {
private var _binding: FragmentExampleBinding? = null
private val binding get() = _binding!!
override fun onCreateView(
inflater: LayoutInflater, container: ViewGroup?,
savedInstanceState: Bundle?
): View? {
_binding = FragmentExampleBinding.inflate(inflater, container, false)
return binding.root
}
override fun onViewCreated(view: View, savedInstanceState: Bundle?) {
super.onViewCreated(view, savedInstanceState)
binding.textView.text = "Updated with ViewBinding in Fragment!"
}
override fun onDestroyView() {
super.onDestroyView()
_binding = null
}
}Enabling ViewBinding:
In build.gradle, ViewBinding support is enabled by adding the viewBinding { enabled = true } block.
Creating an instance of the binding class:
In MainActivity and ExampleFragment, an instance of the binding class is created that is generated based on the XML layout name (e.g. ActivityMainBinding for activity_main.xml).
Initializing the binding:
In onCreate for the activity and onCreateView for the fragment, the binding object is initialized by calling the inflate method.
Access to views:
Instead of using findViewById, UI elements are accessed through the binding object, such as binding.textView and binding.button.
Lifecycle management in fragments:
In the fragment's onDestroyView , the _binding object is reset to prevent memory leaks.
➤ How RecyclerView Works
This is a tool for displaying large data lists in Android. It improves performance and optimizes memory usage by reusing (recycling) list item views when they extend beyond the screen.
How RecyclerView works:
Reuse of species:
When a list item goes off-screen, its view is put into a pool for reuse. This improves performance and reduces memory load.
Layout Manager:
Defines how items will be laid out inside the RecyclerView. The example uses LinearLayoutManager, but GridLayoutManager and StaggeredGridLayoutManager are also available.
Adapter:
The adapter provides the connection between data and views. It creates new views as needed and populates them with data.
The main components of RecyclerView are:
Adapter:
Provides data for list items and creates new item types (ViewHolder).
ViewHolder:
holds the representations of list items and ensures their reuse.
LayoutManager:
Responsible for measuring and positioning elements within the RecyclerView.
Main methods of RecyclerView.Adapter
onCreateViewHolder:
Creates new types of list items (ViewHolder).
onBindViewHolder:
Populates the view with data from the dataset.
getItemCount:
Returns the total number of elements in the dataset.
dependencies {
    implementation 'androidx.recyclerview:recyclerview:1.2.1'
}
<?xml version="1.0" encoding="utf-8"?>
<LinearLayout xmlns:android="http://schemas.android.com/apk/res/android"
android:layout_width="match_parent"
android:layout_height="wrap_content"
android:orientation="vertical"
android:padding="16dp">
<TextView
android:id="@+id/textView"
android:layout_width="wrap_content"
android:layout_height="wrap_content"
android:text="Item"
android:textSize="18sp" />
</LinearLayout><?xml version="1.0" encoding="utf-8"?>
<RelativeLayout xmlns:android="http://schemas.android.com/apk/res/android"
android:layout_width="match_parent"
android:layout_height="match_parent">
<androidx.recyclerview.widget.RecyclerView
android:id="@+id/recyclerView"
android:layout_width="match_parent"
android:layout_height="match_parent" />
</RelativeLayout>import android.view.LayoutInflater
import android.view.View
import android.view.ViewGroup
import android.widget.TextView
import androidx.recyclerview.widget.RecyclerView
class MyAdapter(private val itemList: List<String>) : RecyclerView.Adapter<MyAdapter.MyViewHolder>() {
class MyViewHolder(itemView: View) : RecyclerView.ViewHolder(itemView) {
val textView: TextView = itemView.findViewById(R.id.textView)
}
override fun onCreateViewHolder(parent: ViewGroup, viewType: Int): MyViewHolder {
val itemView = LayoutInflater.from(parent.context)
.inflate(R.layout.item_view, parent, false)
return MyViewHolder(itemView)
}
override fun onBindViewHolder(holder: MyViewHolder, position: Int) {
val currentItem = itemList[position]
holder.textView.text = currentItem
}
override fun getItemCount() = itemList.size
}import android.os.Bundle
import androidx.appcompat.app.AppCompatActivity
import androidx.recyclerview.widget.LinearLayoutManager
import androidx.recyclerview.widget.RecyclerView
class MainActivity : AppCompatActivity() {
private lateinit var recyclerView: RecyclerView
private lateinit var adapter: MyAdapter
private lateinit var itemList: List<String>
override fun onCreate(savedInstanceState: Bundle?) {
super.onCreate(savedInstanceState)
setContentView(R.layout.activity_main)
recyclerView = findViewById(R.id.recyclerView)
// Initialization of data
itemList = listOf("Item 1", "Item 2", "Item 3", "Item 4", "Item 5")
// Setting up the adapter and layout manager
adapter = MyAdapter(itemList)
recyclerView.adapter = adapter
recyclerView.layoutManager = LinearLayoutManager(this)
}
}➤ What is the difference between Custom View and Custom Drawing
Custom View:
is a custom widget that is created by extending an existing View class or its subclass. When creating a custom view, we can define new attributes, methods, and event handlers, as well as change the display of the view. Custom View can be reused in different layouts and gives the ability to create custom interface components.
Custom Drawing:
is the process of drawing on a canvas using the methods of the Canvas class. This approach allows you to draw various elements on the screen, such as lines, rectangles, circles, text, images, etc. Custom Drawing can be used when you need to create dynamic interface elements that cannot be achieved using standard UI elements.
➤ What is Deep Link and App Link
Deep Link:
is a link to specific content within a mobile app. It allows users to navigate directly to the desired app screen, bypassing additional steps such as searching within the app. An app that supports Deep Link can process specific URLs and launch the corresponding app screens if they are available on the user's device.
App Link:
This is a more advanced version of Deep Link, which allows an application to register to handle certain URLs as its own. This means that a user can navigate to the application's content through a website, and the system will automatically open the corresponding application if it is installed on the user's device. The application can also provide information about itself to the website, such as icons and titles, making the process more intuitive and attractive to users.
➤ What is Navigation Architecture Component, what is it for and how does it work
NavGraph:
a list of fragments that we will create and fill. NavController will be able to show fragments only from this list
NavHostFragment:
container. Inside it, the NavController will display fragments.
NavController:
An object that manages the application's navigation in NavHost. It coordinates the changing content of the destinations in NavHost as the user navigates through the application.
<?xml version="1.0" encoding="utf-8"?>
<navigation xmlns:android="http://schemas.android.com/apk/res/android"
    xmlns:app="http://schemas.android.com/apk/res-auto"
    xmlns:tools="http://schemas.android.com/tools"
    android:id="@+id/nav_main"
    app:startDestination="@id/mainFragment">

  <fragment
      android:id="@+id/mainFragment"
      android:name="com._.Main"
      android:label="mainFragment"
      tools:layout="@layout/fragment_main">
    <action
        android:id="@+id/action_mainFragment_to_settingsFragment"
        app:destination="@id/settingsFragment"
        app:popUpTo="@id/settingsFragment"
        app:popUpToInclusive="true"/>
    <action
        android:id="@+id/action_mainFragment_to_settingsBottomSheetFragment"
        app:destination="@id/settingsBottomSheetFragment" />
  </fragment>

  <fragment
      android:id="@+id/settingsFragment"
      android:name="com._.settingsFragment"
      android:label="settingsFragment"
      tools:layout="@layout/fragment_settings">
  </fragment>

  <dialog
      android:id="@+id/settingsBottomSheetFragment"
      android:name="com._.SettingsBottomSheetFragment"
      android:label="settingsBottomSheetFragment"
      tools:layout="@layout/bottom_sheet_settings" />

</navigation>➤ What is Content Uri
URI (Uniform Resource Identifier) for accessing data inside Android applications. It is used to access different types of data such as images, videos, sounds, contacts, calendars, etc.
Content Uri are typically in the format “content://authority/path/id”, where “authority” is the content provider identifier, “path” is the path to a specific resource, and “id” is a unique identifier for the resource.
For example, to access photos stored in the device gallery, you can use the following Content Uri: “content://media/external/images/media”. To access a specific image, you can add the image ID to the end of the Uri: “content://media/external/images/media/123”.
Content Uri is used to exchange data between different Android applications and components, and to perform data reading and writing operations such as adding, updating, and deleting records.
➤ How to make transition animation for navigation component
In the res folder, an anim folder is created with animation resources.
In the res/navigation/nav_graph.xml file, on the design tab, select the transition arrow between screens and in the attributes panel on the right, open the Animations section.
The transition has four properties that can be animated:
enterAnim: Entrance to destination
exitAnim: exit from destination
popEnterAnim: enter destination with pop action
popExitAnim: exit destination with pop action
View can be animated using Transition Framework
➤ What are the advantages and disadvantages of png and svg and when is it better to use one or the other
PNG is a raster format, pixels will be visible when zoomed in strongly, SVG is a vector format and does not depend on screen resolution
➤ Name all cases when onSaveInstanceState and onRestoreInstanceState will be called
onSaveInstanceState():
Called before an activity is destroyed, such as when the screen is rotated, the application is minimized, or the device configuration is changed. This method is used to save the state of the activity that may be lost when the activity is destroyed and restored. It is also called before the activity is destroyed by the system in case of insufficient memory. In this case, the method is used to save the state of the activity that can be restored if necessary.
onRestoreInstanceState():
Called after the activity has been restored from the state saved in onSaveInstanceState(). This method is used to restore the activity state saved in onSaveInstanceState(). It can be called not only after screen rotation or device configuration changes, but also in other cases when the activity has been destroyed and recreated by the system, such as when recovering from an app crash.
➤ What do dpi, dp, sp, dip, px, mm, in and pt mean?
dpi:
screen density, number of pixels per inch.
dp, sp:
abstract density-independent pixels for element and text sizes. We've written about the relationship between dp and px before.
dip:
not mentioned in the documentation, but understood by the compiler, a synonym for dp.
px:
size expressed in physical number of screen pixels.
mm, in:
physical size on the screen, in millimeters and inches respectively.
pt:
typographic point, also a physical dimension equal to 1/72 of an inch.
➤ What task schedulers exist in Android
Handler:
allows you to execute deferred tasks. It is not a pure task scheduler, since it works at the application process level, not the operating system. If the application is stopped, the code scheduled via Handler will not be executed. Handler allows you to send messages to other threads with or without a delay, as well as process received messages. Handler is always associated with a Looper, which in turn is associated with a thread. When creating a Handler, you can pass a Looper object to the constructor. If the default constructor is used, then Handler is created on the current thread. If Looper is not associated with the thread, then a RuntimeException is thrown when creating Handler.
AlarmManager:
Runs scheduled operations even if the application is stopped. PendingIntents are used as operations. AlarmManager is available since API v1, but does not work in Doze Mode by default. To work in Doze Mode, use the setAndAllowWhileIdle() method. This method is available since API v23.
JobScheduler:
allows working in Doze Mode and is available since API v21.
The system groups tasks scheduled via JobScheduler. When the Doze Mode window appears, several tasks are executed at once. This approach saves the device battery.
WorkManager:
library from Android Jetpack. WorkManager works starting with API v14. Google recommends using WorkManager instead of previously developed solutions. Under the hood, WorkManager uses JobScheduler on devices with API v23+. On API versions 14–22, GCMNetworkManager or AlarmManager is used.
➤ What are the main Layouts in Android and what is their performance
LinearLayout:
This is the simplest type of Layout, which is oriented to horizontal or vertical arrangement of child elements. It works quickly on all versions of Android.
RelativeLayout:
is a type of Layout that allows child elements to be positioned relative to each other or relative to a parent element. Complex RelativeLayout hierarchies can lead to poor performance, so it is best to avoid using this type of Layout unless necessary.
GridLayout:
is a type of Layout that allows you to create tables and arrange elements at the intersection of rows and columns. GridLayout can be very effective when used in the right context.
ConstraintLayout:
is a type of Layout that allows you to create complex View hierarchies using constraints. ConstraintLayout can be efficient if configured correctly, and can even outperform RelativeLayout.
FrameLayout:
This is a simple type of Layout that can only contain one child element. It is fast, but not suitable for placing multiple elements.
TableLayout:
is designed to place elements in a table. It can be useful for screens with a lot of data or for displaying a list.
GridLayout:
Allows you to arrange elements in a grid. It is especially useful for screens with a lot of data, such as list or table screens.
ScrollView:
used to create scrolling content. This type of layout can be useful for screens with a lot of text or images.
➤ Can AndroidManifest contain multiple main activities
The main activity is an activity whose intent-filter contains ACTION_MAIN and CATEGORY_LAUNCHER.
You can add multiple main activities to AndroidManifest.
For each activity, an icon will appear in the application menu.
By default, the application icon and name specified in the icon and label attributes of the application element in the manifest will be used. These attributes can be overridden in the activity element.
This mechanism can be useful for libraries that are used in debug/testing builds. For example, the leakcanary library adds an icon to launch its activity from the application menu.
➤ What are multi declarations
Generated component functions for data classes allow them to be used in multi-declarations.
val jane = User("Jane", 35)
val (name, age) = jane
println("$name, $age years of age")
// outputs "Jane, 35 years of age"➤ What types of services are there in Android
Foreground Service:
a service that runs in the foreground and provides visible functionality to the user. A background service can be turned into a foreground service by calling the startForeground() method.
Background Service:
a service that runs in the background and provides no noticeable functionality to the user. Unlike a foreground service, a background service can be destroyed by the system at any time when the system needs to free up memory.
Bound Service:
A service that provides a connection between an application and another part of the system, such as another application or service. A Bound service can interact with a client by providing it with an IBinder object via the onBind() method. Clients can use this object to call methods defined in the service. When all clients have disconnected from the service, it is destroyed.
IntentService:
This is a subclass of Service that is used to perform tasks in the background.
IntentService automatically creates a new thread to handle each intent sent to the service. When the intent is processed, the service automatically terminates. If a new intent arrives while the service is running, it is added to the queue and processed in turn.
IntentService also provides synchronization by blocking new intents until previous ones have completed processing.
The main use of IntentService is to perform long running operations such as downloading data from the network, processing images, saving data to a database, etc. All these operations can be performed in the background so as not to block the main UI thread.
JobIntentService:
is a legacy class in Android that is designed to handle background tasks that can be performed in the background using a service. It was introduced in the Android Support Library for backward compatibility. JobIntentService works similarly to IntentService, but has additional functionality to handle tasks that need to be performed in the background, and to handle those tasks in the background even after the app has been stopped. Unlike a regular IntentService, JobIntentService automatically manages the lifecycle of the service and ensures that the service is not stopped until all tasks are completed.
Starting with Android 12, it is recommended to use WorkManager to run background tasks instead of JobIntentService.
Example of using the service:
Create a class for the service that inherits from Service. For example, create a file MyService.kt with the following contents:
class MyService : Service() {

    private val binder = MyServiceBinder()

    override fun onCreate() {
        // Executed when the service is created
    }

    override fun onStartCommand(intent: Intent?, flags: Int, startId: Int): Int {
        // Executed when the service starts
        return START_STICKY
    }

    override fun onDestroy() {
        // Executed when the service is terminated
    }

    override fun onBind(intent: Intent?): IBinder? {
        // method that must be overridden in the Service class,
        // to provide a client (usually an activity) with the ability to contact the service via the IBinder interface.
        // This method should return an IBinder object,
        // which the client can use to interact with the service.
        // If the service does not provide the ability to communicate with the client,
        // This method may simply return null.
        return binder
    }

inner class MyServiceBinder : Binder() {
        fun getService(): MyService {
            return this@MyService
        }
    }
}
Add the service to your application's manifest file, specifying the service class name and permissions if needed. For example, add the following code to your AndroidManifest.xml file
<manifest xmlns:android="http://schemas.android.com/apk/res/android"
    package="com.example.myapplication">

    <application
        android:allowBackup="true"
        android:icon="@mipmap/ic_launcher"
        android:label="@string/app_name"
        android:theme="@style/AppTheme">

        <service
            android:name=".MyService"
            android:enabled="true"
            android:exported="false" />

        <activity
            android:name=".MainActivity"
            android:label="@string/app_name"
            android:theme="@style/AppTheme.NoActionBar">
            <intent-filter>
                <action android:name="android.intent.action.MAIN" />

                <category android:name="android.intent.category.LAUNCHER" />
            </intent-filter>
        </activity>
    </application>

</manifest>
Start and stop
val serviceIntent = Intent(this, MyService::class.java)
startService(serviceIntent)

val serviceIntent = Intent(this, MyService::class.java)
stopService(serviceIntent)
➤ Which classes are used to access sensors
SensorManager:
entry point for working with sensors and their event listeners. System service, obtained by the name Context.SENSOR_SERVICE;
Sensor:
represents a single sensor. Provides various meta-information (power consumption, accuracy, manufacturer, etc.);
SensorEventListener:
interface for implementing event handlers coming from sensors. It implements the logic of processing incoming data;
SensorEvent:
individual event from the sensor: data and the accuracy of its measurement.
➤ What are the main annotations and methods in Room
@Entity(tableName = “users”):
data class
@Entity(primaryKeys = [“firstName”, “lastName”]):
composite primary key is used
@Entity(ignoredColumns = [“picture”]):
ignore
@PrimaryKey(autoGenerate = true):
primary key in data class
@ColumnInfo(name = “first_name”):
column name if it should be different from the variable name
@Ignore:
do not use this field or this constructor
@Dao:
abstract class or interface for working with a table
@Transaction:
execute as one transaction, atomically
@Database(entities = [User::class], version = 1):
abstract class that extends RoomDatabase
@Database(entities = [User::class], version = 1):
abstract class AppDatabase : RoomDatabase() {
    abstract fun userDao(): UserDao
}
val db = Room.databaseBuilder(applicationContext, AppDatabase::class.java, "database-name").build()
@TypeConverters(DateConverter.class):
class Converters {
  @TypeConverter
  fun fromTimestamp(value: Long?): Date? {
    return value?.let { Date(it) }
  }
@TypeConverter
  fun dateToTimestamp(date: Date?): Long? {
    return date?.time?.toLong()
  }
}
@Database(entities = [User::class], version = 1)
@TypeConverters(Converters::class)
abstract class AppDatabase : RoomDatabase() {
  abstract fun userDao(): UserDao
}
val db = Room.databaseBuilder(...)
  .addTypeConverter(exampleConverterInstance)
  .build()
@Query(“SELECT * FROM Users”):
sql query
@Insert(onConflict = OnConflictStrategy.REPLACE):
insert into table
@Delete:
delete from table
@Update:
update
@DatabaseView:
encapsulates the request into a class
@Fts3 or @Fts4:
in Room 2.1.0 use FTS full-text search
@AutoValue:
https://github.com/google/auto/blob/master/value/userguide/index.md
@MapInfo(keyColumn = “userName”, valueColumn = “bookName”):
returns a mapping between tables
@Embedded(prefix = “address”):
take fields from the marked class and consider them as table fields, prefix is needed if the names match
@Relation(parentColumn = “userId”, entityColumn = “userOwnerId”):
will look for where parentColumn is equal to entityColumn, may also have a property associateBy = Junction(PlaylistSongCrossRef::class) where
@Entity(primaryKeys = ["playlistId", "songId"])
data class PlaylistSongCrossRef(
    val playlistId: Long,
    val songId: Long
)
One to one dependency:
@Entity
data class User(
    @PrimaryKey val userId: Long,
    val name: String,
    val age: Int
)
@Entity
data class Library(
    @PrimaryKey val libraryId: Long,
    val userOwnerId: Long
)
data class UserAndLibrary(
    @Embedded val user: User,
    @Relation(parentColumn = "userId", entityColumn = "userOwnerId")
    val library: Library
)
@Transaction
@Query("SELECT * FROM User")
fun getUsersAndLibraries(): List<UserAndLibrary>
One to many dependency:
@Entity
data class User(
    @PrimaryKey val userId: Long,
    val name: String,
    val age: Int
)
@Entity
data class Playlist(
    @PrimaryKey val playlistId: Long,
    val userCreatorId: Long,
    val playlistName: String
)
data class UserWithPlaylists(
    @Embedded val user: User,
    @Relation(parentColumn = "userId", entityColumn = "userCreatorId")
    val playlists: List<Playlist>
)
@Transaction
@Query("SELECT * FROM User")
fun getUsersWithPlaylists(): List<UserWithPlaylists>
Many-to-many dependency:
@Entity
data class Playlist(
    @PrimaryKey val playlistId: Long,
    val playlistName: String
)
@Entity
data class Song(
    @PrimaryKey val songId: Long,
    val songName: String,
    val artist: String
)
@Entity(primaryKeys = ["playlistId", "songId"])
data class PlaylistSongCrossRef(
    val playlistId: Long,
    val songId: Long
)
data class PlaylistWithSongs(
    @Embedded val playlist: Playlist,
    @Relation(parentColumn = "playlistId", entityColumn = "songId", associateBy = Junction(PlaylistSongCrossRef::class))
    val songs: List<Song>
)
data class SongWithPlaylists(
    @Embedded val song: Song,
    @Relation(parentColumn = "songId", entityColumn = "playlistId", associateBy = Junction(PlaylistSongCrossRef::class))
    val playlists: List<Playlist>
)
@Transaction
@Query("SELECT * FROM Playlist")
fun getPlaylistsWithSongs(): List<PlaylistWithSongs>
@Transaction
@Query("SELECT * FROM Song")
fun getSongsWithPlaylists(): List<SongWithPlaylists>
Using Join, you can combine tables in Room in an alternative way to Embedded and Relation. The queries are more difficult to write using SQL syntax, but they work much faster than automatic merging via Embedded and Relation.
Asynchronous requests:
coroutines: suspend fun loadUserById(id: Int): User
RX: public Single loadUserById(int id);
LiveData: public ListenableFuture loadUserById(int id);
Subscription:
coroutines: fun loadUserById(id: Int): Flow
RX: public Flowable loadUserById(int id);
LiveData: public LiveData loadUserById(int id);
Pre-filling:
Room.databaseBuilder(appContext, AppDatabase.class, "Sample.db")
    .createFromAsset("database/myapp.db")
    .build()
// or
Room.databaseBuilder(appContext, AppDatabase.class, "Sample.db")
    .createFromFile(File("mypath"))
    .build()
Migrations:
Room.databaseBuilder(appContext, AppDatabase.class, "Sample.db")
    .createFromAsset("database/myapp.db")
    .fallbackToDestructiveMigration()
    .build()
// or
Room.databaseBuilder(appContext, AppDatabase.class, "Sample.db")
    .createFromAsset("database/myapp.db")
    .addMigrations(MIGRATION_1_2)
    .build()
    val MIGRATION_1_2 = object : Migration(1, 2) {
      override fun migrate(database: SupportSQLiteDatabase) {
        database.execSQL("CREATE TABLE `Fruit` (`id` INTEGER, `name` TEXT, " +
          "PRIMARY KEY(`id`))")
      }
    }
// or
@Database(version = 2, entities = [User::class], autoMigrations = [AutoMigration (from = 1, to = 2)])